
Last Updated on August 5, 2023 by Marc Smith
We all know the pattern, it breaks or wears, you pay to fix it. The question is, do you tackle it yourself or spend the money getting a contractor in? This, of course, depends vastly on your ability and sometimes, your pocket. Start small is the trick, don’t start something you know you’ll be unable to finish, maybe due to your fitness or lack of tools.
But here follow three typical home renovations that you can do yourself, along with a rough estimate of the money you will save. They’re a lot easier than you may think.
-
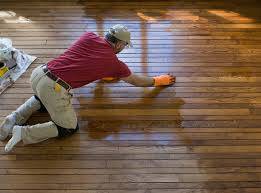
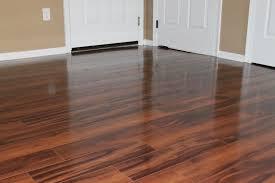
Installing a hardwood floor.
You know the scenario, you’re fed up with (or maybe your wife is!) the carpets and a hardwood floor would make it all better. You can make this easy by firstly choosing pre-varnished and pre-cut lengths. One company or another will always have hardwood flooring on sale, shop around, choose the color and design that you like and get buying.
The next thing to do is… nothing. It’s always best to allow the wood to reach the same temperature and humidity as your house, so leave the wood in the house for a week or so. If you lay the flooring immediately you may find it shrinks and you’re left with gaps.
When you start, the tongue and groove allow you to fit it together like a jigsaw puzzle, once the first line is down, the rest slots in quickly. If there are two of you, one slot the piece in, the other gets busy with the nailer. At the end of each row, use a circular saw to ensure it fits snugly and start on the next row.
Try to mix up the grain pattern and lengths of the flooring; you don’t want a straight line of joins going across your floor.
The last row may need to be ripped to make it fit, if you don’t have a table saw, try to borrow or rent one, you certainly don’t want to be buying one for just the one job.
Install hardwood floors in three rooms and a hallway (total 700 sq ft)
-
Hardwood flooring: $3’500
-
Compressor, nail gun, nails: $160
-
Table saw (rental): $80
-
Total: $3’740
-
Contractor price: $5’484
-
Save: $1744
-
Circular saw/chop saw: $80
-
Tape measure: $20
-
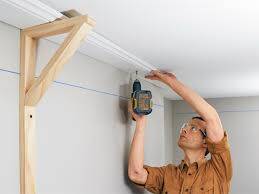
Crown molding and trim
There are not many jobs that can improve your home quicker and easier than crown molding and baseboard trim.
There are many makes and materials out there, only go for hardwood if you are sure you’re ceiling/floor are 100% straight. MDF is far more forgiving, both of uneven surfaces and the occasional fitter error!
The size of the molding should be gauged using the height of your ceiling, a standard 8ft ceiling would need the four-inch wide crown, if lower go for the 3.5 inches if you live in a cathedral, go for the widest available!
Next, you need an accurate measure of your ceiling. You can buy pre-cut lengths of up to 16ft which may well be the cheapest option. Alternatively, you can buy by the linear foot, this will without doubt limit wastage, and in a large room prevent unsightly joins.
You’ll need a miter saw to ensure perfect 45-degree angles in the corners, use glue to secure the joint and a nail gun to fix the lengths. I mostly use air tools to get all the trim work done. For this you will need an air compressor and nail gun. You can find more information on how to find the best air compressor here.
Another pair of hands will be, well, handy! If you’re trying to man-handle long lengths by yourself you will most certainly find this job far trickier.
Once it’s up, caulk the top and bottom to fill any gaps caused by uneven walls and ceilings, paint (unless you’re using hardwood) and you’re finished. Stand back and admire!
Install crown molding and trim in four rooms (12 x 12 ft each)
-
200 linear feet of 4-inch pine molding $480
-
Compressor, nail gun, nails: $160
-
Compound miter saw: $120
-
Four-foot level: $24
-
Caulk: $16
-
Total: $800
-
Contractor price: $1,360
-
Save: $560
-
Tape measure: $25
-
Set square: $20
-
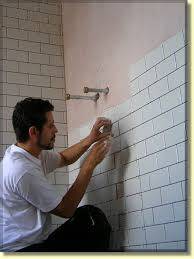
Tiling a bathroom
Many people are pretty scared about tiling, working with wood is one thing, those ceramic tiles, another story. But not so! It’s really quite simple and can give a much-needed update to any bathroom, turning it into a modern tranquil oasis.
Buy tiles that are easy to work with. Smaller tiles come in one ft sheets, held together by a fiberglass backing. These are pre-spaced and held together in a perfect square. Smaller 3 – 6-inch tiles can come with protruding edges; this means that when you push them together they are automatically spaced. If not you will need to buy spacers which is a little more tricky but still do-able.
Once you’ve chosen your tiles, give the walls a quick wipe down, clean and dry is the answer. Mix your cement and get sticking. Start with a small area, don’t plaster the cement all over, it will dry quite quickly. Once you get going you’ll be able to gauge how large an area to do at once. Use a special v-groove trowel for easier application.
You’ll need a tile cutter or wet saw to cut the tiles to fit the edges without chipping or cracking them.
Leave the tiles one day before applying the grout. Apply the grout to the gaps using a tile float, and then leave to set a little before you wipe off the excess. This would usually be an hour but check after 30 mins, trying to scrape set grout of the tiles is not fun. Clean across the joints first using the float and then a damp tile sponge, and then wipe the face with the sponge. Timing and the right amount of water are the secrets here.
Tile a three-wall bath and shower stall (total 100 sq ft)
-
Tile: $400
-
Cement: $12
-
Grout: $12
-
Tile saw (rental): $32
-
Tile float: $4
-
Grout sponge: $4
-
V-trowel: $8
-
Total: $472
-
Contractor price: $872
-
Save: $400
-
Tape measure: $20